[vc_message color=”info”]Since the publication of our article, TomTom has issued an update for the TomTom Bandit app. Amongst other things, you can choose the length of your film in the “shake to edit” option. You can also add height graphics to your movie. The issues with the app we addressed in our review remain.[/vc_message]
 The white balance (slightly more blue compared GoPro) is fine and the image in most lighting conditions is sufficiently sharp, although compared to the GoPro they could improve the Bandit just a bit. But as you can see in the video review, the difference is not that big.
There is an interesting function in which you film directly in slow motion. Normally you shoot your footage at normal speed for example in 1080 at 60fps and make your slo-mo in your editing software suite. To keep the editing process simple (we’ll look at that more in depth later on), the Bandit has the ability to record directly into slo-mo. And you can do that in a range of speeds and resolutions with the ratio between the two chosen in such a way as to ensure a smooth image. Quick, smart and simple. You have to know in advance that you exactly want that piece of the action in slo-mo. So think before you shoot.
Finally, the TomTom also offers the possibility to record foto bursts and time lapses. Works fine for me and I consider it a basic functionality for an action cam.
The white balance (slightly more blue compared GoPro) is fine and the image in most lighting conditions is sufficiently sharp, although compared to the GoPro they could improve the Bandit just a bit. But as you can see in the video review, the difference is not that big.
There is an interesting function in which you film directly in slow motion. Normally you shoot your footage at normal speed for example in 1080 at 60fps and make your slo-mo in your editing software suite. To keep the editing process simple (we’ll look at that more in depth later on), the Bandit has the ability to record directly into slo-mo. And you can do that in a range of speeds and resolutions with the ratio between the two chosen in such a way as to ensure a smooth image. Quick, smart and simple. You have to know in advance that you exactly want that piece of the action in slo-mo. So think before you shoot.
Finally, the TomTom also offers the possibility to record foto bursts and time lapses. Works fine for me and I consider it a basic functionality for an action cam.
 On the front of the camera, under the lens, TomTom has placed the Bandit’s microphone. Makes sense because the source of the sound, of course, is often the subject of your shot. The disadvantage of this is that if you’re shooting at high speed, the wind rushing into the mic will produce a lot of wind noise. Other sounds are totally drowned. TomTom has come up with a funky little solution to that. The Bandit has been provided with a kind of small fluffy windshieldy thing which is attachable to a velcro strap/sticker which you stick onto the camera, over the microphone. This windshield, resembling the goatee of a goat (perhaps no coincidence that the goat prominent figures in the marketing of the Bandit) reduces the wind noise quite substantially. Works very well so; beware, do not lose your goatee!
The quality of the audio is also well organized, although you’ll notice that when you sit on more than two meters, the audibility of voices eg rapidly falling. Environmental noise can go step further away much to the forefront and generate noise.
I found the Bandit very easy to use. There are also some nice unique choices that TomTom made. First of which is that the Bandit comes without cables or wired connectivity. The connection to your phone goes via wifi (signal produced by the Bandit itself). The connection to your PC / laptop or access to charger goes through the USB plug which is actually a part of the “batt-stick”, the actual inside of the Bandit. You simply slide it out of the housing of the camera. There are charging led lights on the batt stick to see how far the Bandit is charged. The placement of these can be more convenient though. If I stick the batt-stick into my Mac, the lights face downward so you can’t actually see them. A minor detail. And for other PC or iMac set-ups, it might work fine.
In addition, you can easily slide your Micro SD card into the appropriate slot on the battery stick. Betandsoverdracht to your PC is very rapidly thanks to the USB 3.0 port.
The menu on the camera is extremely easy to operate. The central navigation button makes it possible to navigate, left, right, up and down, running through the various menu options easily and never really losing your way in the menu. Right away I made much fewer navigation mistakes in the Bandit menu than I still make on my GoPro that I have been using for the past eight years.
The battery life is excellent, not necessarily to write home about, but certainly not below par. In some tests to get the 1080p / 60fps over 2 hours of continuous movie time.
What I really like is that TomTom has a steel frame the different mounts click into. it’s a very simple system (quick release, no hassle with screws) which the camera still fastened into quite well. This camera can rotate 180 degrees in this frame. Especially when using side mounts (eg side helmet) this is a great help. No hassle with different sorts of connection clips, which can at times lead to complete constructions on your helmet. Just snap into the mount and rotate the camera as a whole until it has the correct angle. And when you change your mount direction, simply rotate the camera to the new desired angle.
The Bandit also comes with a remote. It connects very simply, and I used it on a number of bike rides from my handlebars. I generally have my action cam so close that I almost never need a remote. Regardless, it does work well. On, off and to mark highlights.
The Bandit has no casing as many action cams do and is basically waterproof to 10 meters deep and half hours straight as is. With the optional waterproof lens cover you can get it safely to 50meters deep. We did not test this depth as we did not have the lens cover available.
Turning the camera on and off works with two different buttons. I sometimes find that difficult to work (especially as I am used to just one button), but also because you often find your fingers looking to find the correct button those buttons. Especially the off button is flush with the surface of the housing, so it is quite difficult to find solely by touch (as a result your clip continues to run if you have not clicked well enough.) I prefer just one on and off button which you can find and operate easy by touch. After all: eyes on the trail / slope / waves / sky and so on! A god example of this is the sliding button on the Garmin Virb Elite. You can feel that your camera is on or off.
TomTom assumes that every piece of video has certain highlights – quite right, obviously. Fit them together and you’ve got a video. In action sports, these highlights will mainly related to speed, g-forces or heart rate. You rocket downhill, run through a tight turn, feel the adrenaline rush, and so on. Because the Bandit has GPS functionality, and you can connect with a TomTom heart rate monitor (we had none available, unfortunately), the Bandit can make highlights of the moments when these data points spike. In the clip, the Bandit automatically marks the highlights and these can be recognized on the timeline of the clip by the various icons. The problem is that not all icons are immediately self-explanatory, and no information is provided (in the app or otherwise) as to what every icon means. Beside these lines, you can see the list of the icons and their meanings. In addition to that, you can mark highlights manually during recording, by pressing the on / highlight button, if you have a hand free that is. That is where the remote can come in handy. Also afterwards, while playing back the images in your app you can add extra highlights.
If you want to create an edit, you connect the Bandit through its own WiFi signal to your smartphone or tablet. When you do, the app reads the images out to your smartphone. That happens from a media server that is built into the Bandit. This is an important advantage; because you actually stream the footage to your smartphone (you don’t need to upload the footage to your device, which would take ages and finish off any remaining memory space on the device), the connection is very fast and you can mount easily and quickly.
On the front of the camera, under the lens, TomTom has placed the Bandit’s microphone. Makes sense because the source of the sound, of course, is often the subject of your shot. The disadvantage of this is that if you’re shooting at high speed, the wind rushing into the mic will produce a lot of wind noise. Other sounds are totally drowned. TomTom has come up with a funky little solution to that. The Bandit has been provided with a kind of small fluffy windshieldy thing which is attachable to a velcro strap/sticker which you stick onto the camera, over the microphone. This windshield, resembling the goatee of a goat (perhaps no coincidence that the goat prominent figures in the marketing of the Bandit) reduces the wind noise quite substantially. Works very well so; beware, do not lose your goatee!
The quality of the audio is also well organized, although you’ll notice that when you sit on more than two meters, the audibility of voices eg rapidly falling. Environmental noise can go step further away much to the forefront and generate noise.
I found the Bandit very easy to use. There are also some nice unique choices that TomTom made. First of which is that the Bandit comes without cables or wired connectivity. The connection to your phone goes via wifi (signal produced by the Bandit itself). The connection to your PC / laptop or access to charger goes through the USB plug which is actually a part of the “batt-stick”, the actual inside of the Bandit. You simply slide it out of the housing of the camera. There are charging led lights on the batt stick to see how far the Bandit is charged. The placement of these can be more convenient though. If I stick the batt-stick into my Mac, the lights face downward so you can’t actually see them. A minor detail. And for other PC or iMac set-ups, it might work fine.
In addition, you can easily slide your Micro SD card into the appropriate slot on the battery stick. Betandsoverdracht to your PC is very rapidly thanks to the USB 3.0 port.
The menu on the camera is extremely easy to operate. The central navigation button makes it possible to navigate, left, right, up and down, running through the various menu options easily and never really losing your way in the menu. Right away I made much fewer navigation mistakes in the Bandit menu than I still make on my GoPro that I have been using for the past eight years.
The battery life is excellent, not necessarily to write home about, but certainly not below par. In some tests to get the 1080p / 60fps over 2 hours of continuous movie time.
What I really like is that TomTom has a steel frame the different mounts click into. it’s a very simple system (quick release, no hassle with screws) which the camera still fastened into quite well. This camera can rotate 180 degrees in this frame. Especially when using side mounts (eg side helmet) this is a great help. No hassle with different sorts of connection clips, which can at times lead to complete constructions on your helmet. Just snap into the mount and rotate the camera as a whole until it has the correct angle. And when you change your mount direction, simply rotate the camera to the new desired angle.
The Bandit also comes with a remote. It connects very simply, and I used it on a number of bike rides from my handlebars. I generally have my action cam so close that I almost never need a remote. Regardless, it does work well. On, off and to mark highlights.
The Bandit has no casing as many action cams do and is basically waterproof to 10 meters deep and half hours straight as is. With the optional waterproof lens cover you can get it safely to 50meters deep. We did not test this depth as we did not have the lens cover available.
Turning the camera on and off works with two different buttons. I sometimes find that difficult to work (especially as I am used to just one button), but also because you often find your fingers looking to find the correct button those buttons. Especially the off button is flush with the surface of the housing, so it is quite difficult to find solely by touch (as a result your clip continues to run if you have not clicked well enough.) I prefer just one on and off button which you can find and operate easy by touch. After all: eyes on the trail / slope / waves / sky and so on! A god example of this is the sliding button on the Garmin Virb Elite. You can feel that your camera is on or off.
TomTom assumes that every piece of video has certain highlights – quite right, obviously. Fit them together and you’ve got a video. In action sports, these highlights will mainly related to speed, g-forces or heart rate. You rocket downhill, run through a tight turn, feel the adrenaline rush, and so on. Because the Bandit has GPS functionality, and you can connect with a TomTom heart rate monitor (we had none available, unfortunately), the Bandit can make highlights of the moments when these data points spike. In the clip, the Bandit automatically marks the highlights and these can be recognized on the timeline of the clip by the various icons. The problem is that not all icons are immediately self-explanatory, and no information is provided (in the app or otherwise) as to what every icon means. Beside these lines, you can see the list of the icons and their meanings. In addition to that, you can mark highlights manually during recording, by pressing the on / highlight button, if you have a hand free that is. That is where the remote can come in handy. Also afterwards, while playing back the images in your app you can add extra highlights.
If you want to create an edit, you connect the Bandit through its own WiFi signal to your smartphone or tablet. When you do, the app reads the images out to your smartphone. That happens from a media server that is built into the Bandit. This is an important advantage; because you actually stream the footage to your smartphone (you don’t need to upload the footage to your device, which would take ages and finish off any remaining memory space on the device), the connection is very fast and you can mount easily and quickly.
 Step 1: First I go through my library of clips. I watch all the clips, if the highlights are good and whether I want to add my own highlights. Some highlights I toke out or I changed the highlight duration or starting point in the clip. I had to find out through google how to do that. This step takes the most time, but playing back your footage can be fun in itself. And you quickly get an idea of what highlights you’ll want to use. And besides, you can also quickly scroll to any highlight on the timeline of the clip.
Step 2: Once I was satisfied with the highlights I choose the option to make a movie, and then instead of choosing “shake to edit” method, tap the green button “add a highlight.” You are directed into the library of highlights, and there you can manually select highlights you want to include in te edit. When you’re finished you go back to the editing screen and check if everything is okay.
Step 3: Adding metrics: It is possible to choose between three metrics, speed, g-forces (if you used a heart rate monitor connected to the Bandit as it rolls). What you get is a graphic overlay of kph?mph, g-force or heart rate. Unfortunately, it is not possible to add multiple metrics in a combined graphic data overlay. Also, there is only one design of the data overlay that you can choose. Undoubtedly TomTom will be adding more options in the future. These are simply software options, you’ll have to update your app. Fun to look forward to. Note that the graphic overlay will be put on every highlight, even those where it is less relevant (if you stand still, during a beauty shot of the environment, etc.). You can remove the graphics from the clips where it doesn’t apply.
Step 4: You can also add a music track. For this the Bandit uses the music on your phone; you can select te track from your iTunes Library. Note that once you have added a track, while you can easily exchange it for another, you can’t go back on your decision to use music at all. That’s a pity. Because sometimes you come to the conclusion that without the music video is better. In addition, the loudness of the music can’t be adjusted, and the sounds of your film or quite difficult to hear. Also: there is the rights issue with most popular music and sometimes Youtube can block movies because of copyright violations. Don’t let that hold you back though! A Bandit native library of rights-free music would be cool though.
Step 5: Saving and sharing are easy. When you have finished the edit, the Bandit will write the highlights to the phone and the app makes the movie. Only then is the file on your phone. You can then save it to your camera roll or share via eg Facebook or Vimeo.
There is one great weakness to the app, and that is that your work is not saved before writing the final edit to the phone. The adjustments you do to highlights is saved, but nothing more. As soon as you’re composing your movie, you have to hope that your app does not crash or your phones runs out of juice. Don’t close the app thinking you can finish the edit later. Because your work will simply be lost. I think that’s a major shortcoming and if asked would advise Tom Tom to see if they can allow you to save the “project”.
In short, not quite as it is marketed, but it is possible to create a fun video and share it quickly and relatively easily (certainly in comparison with desktop installation).
Step 1: First I go through my library of clips. I watch all the clips, if the highlights are good and whether I want to add my own highlights. Some highlights I toke out or I changed the highlight duration or starting point in the clip. I had to find out through google how to do that. This step takes the most time, but playing back your footage can be fun in itself. And you quickly get an idea of what highlights you’ll want to use. And besides, you can also quickly scroll to any highlight on the timeline of the clip.
Step 2: Once I was satisfied with the highlights I choose the option to make a movie, and then instead of choosing “shake to edit” method, tap the green button “add a highlight.” You are directed into the library of highlights, and there you can manually select highlights you want to include in te edit. When you’re finished you go back to the editing screen and check if everything is okay.
Step 3: Adding metrics: It is possible to choose between three metrics, speed, g-forces (if you used a heart rate monitor connected to the Bandit as it rolls). What you get is a graphic overlay of kph?mph, g-force or heart rate. Unfortunately, it is not possible to add multiple metrics in a combined graphic data overlay. Also, there is only one design of the data overlay that you can choose. Undoubtedly TomTom will be adding more options in the future. These are simply software options, you’ll have to update your app. Fun to look forward to. Note that the graphic overlay will be put on every highlight, even those where it is less relevant (if you stand still, during a beauty shot of the environment, etc.). You can remove the graphics from the clips where it doesn’t apply.
Step 4: You can also add a music track. For this the Bandit uses the music on your phone; you can select te track from your iTunes Library. Note that once you have added a track, while you can easily exchange it for another, you can’t go back on your decision to use music at all. That’s a pity. Because sometimes you come to the conclusion that without the music video is better. In addition, the loudness of the music can’t be adjusted, and the sounds of your film or quite difficult to hear. Also: there is the rights issue with most popular music and sometimes Youtube can block movies because of copyright violations. Don’t let that hold you back though! A Bandit native library of rights-free music would be cool though.
Step 5: Saving and sharing are easy. When you have finished the edit, the Bandit will write the highlights to the phone and the app makes the movie. Only then is the file on your phone. You can then save it to your camera roll or share via eg Facebook or Vimeo.
There is one great weakness to the app, and that is that your work is not saved before writing the final edit to the phone. The adjustments you do to highlights is saved, but nothing more. As soon as you’re composing your movie, you have to hope that your app does not crash or your phones runs out of juice. Don’t close the app thinking you can finish the edit later. Because your work will simply be lost. I think that’s a major shortcoming and if asked would advise Tom Tom to see if they can allow you to save the “project”.
In short, not quite as it is marketed, but it is possible to create a fun video and share it quickly and relatively easily (certainly in comparison with desktop installation).
Test conditions
We tested the TomTom bandit over a period of 4 weeks with different activities during an active holiday in Spain. A lot of mountain biking, canyoning, horseback riding ( dusty ), snorkeling and we toke the Bandit along for a number of mountain hikes.The Review
Since the introduction of the first GoPro now 10 years ago, the market for action cameras has become quite cramped. A variety of traditional and less traditional brands have brought action cams to the market with huge differences in quality and in price. There are a lot of options. Conversely, the use of action cams has also become broader; where the first users were the radical or at least action sports fanatics, the action cam has become much more mainstream and at times you could rather speak of a vacation cam. With so much competition but also so think carefully another need of the potential target group, you should mark as what concerns unique to make your camera so that it will stand out, and most importantly, will be sold. TomTom has added two features that can make the Bandit unique:- the integration of GPS data. Although I have to say right off the bat, that they are not entirely unique in this; the Garmin Virb has this functionality, but market leader GoPro doesn’t.
- the ability to quickly and easily edit a video through the TomTom smartphone app. In this, TomTom is, to my knowledge, at the time of testing, unique. Many brands do offer desktop editing software, and almost all of them also have accompanying apps, but not w into an app.ith an editing functionality in the app.
Video
The video specifications are neatly up to par. I think the minimum specifications for video quality should be 1080p (pixels) at 60fps (frames per second) and that’s what the Bandit offers. (You want to know why these specs matter? Check the ActionCam Gear Guide). Added to this, you can shoot at 30fps with 2.7K and 4K at 15 fps. As far as I am concerned these are purely cosmetic specs for marketing. Filming in 15 frames per second makes no sense at all, because the human eye can distinguish individual frames if the frame rate drops below 25 frames per second. So if you move your camera, or if anything moves in your shot, your images will not be close to smooth. Bit silly to expect if you are filming action sports. There are those who believe that the standard for action cams are 2.7 and 4K. But you have to have 30fps, and as long as you can’t shoot 60fps you won’t be able to make any serious slo-mo’s. In addition, the processing of 4K files (video files will be 4 times a large) for most PC’s or Mac’s is already very difficult and 4K-ready screens are not widespread.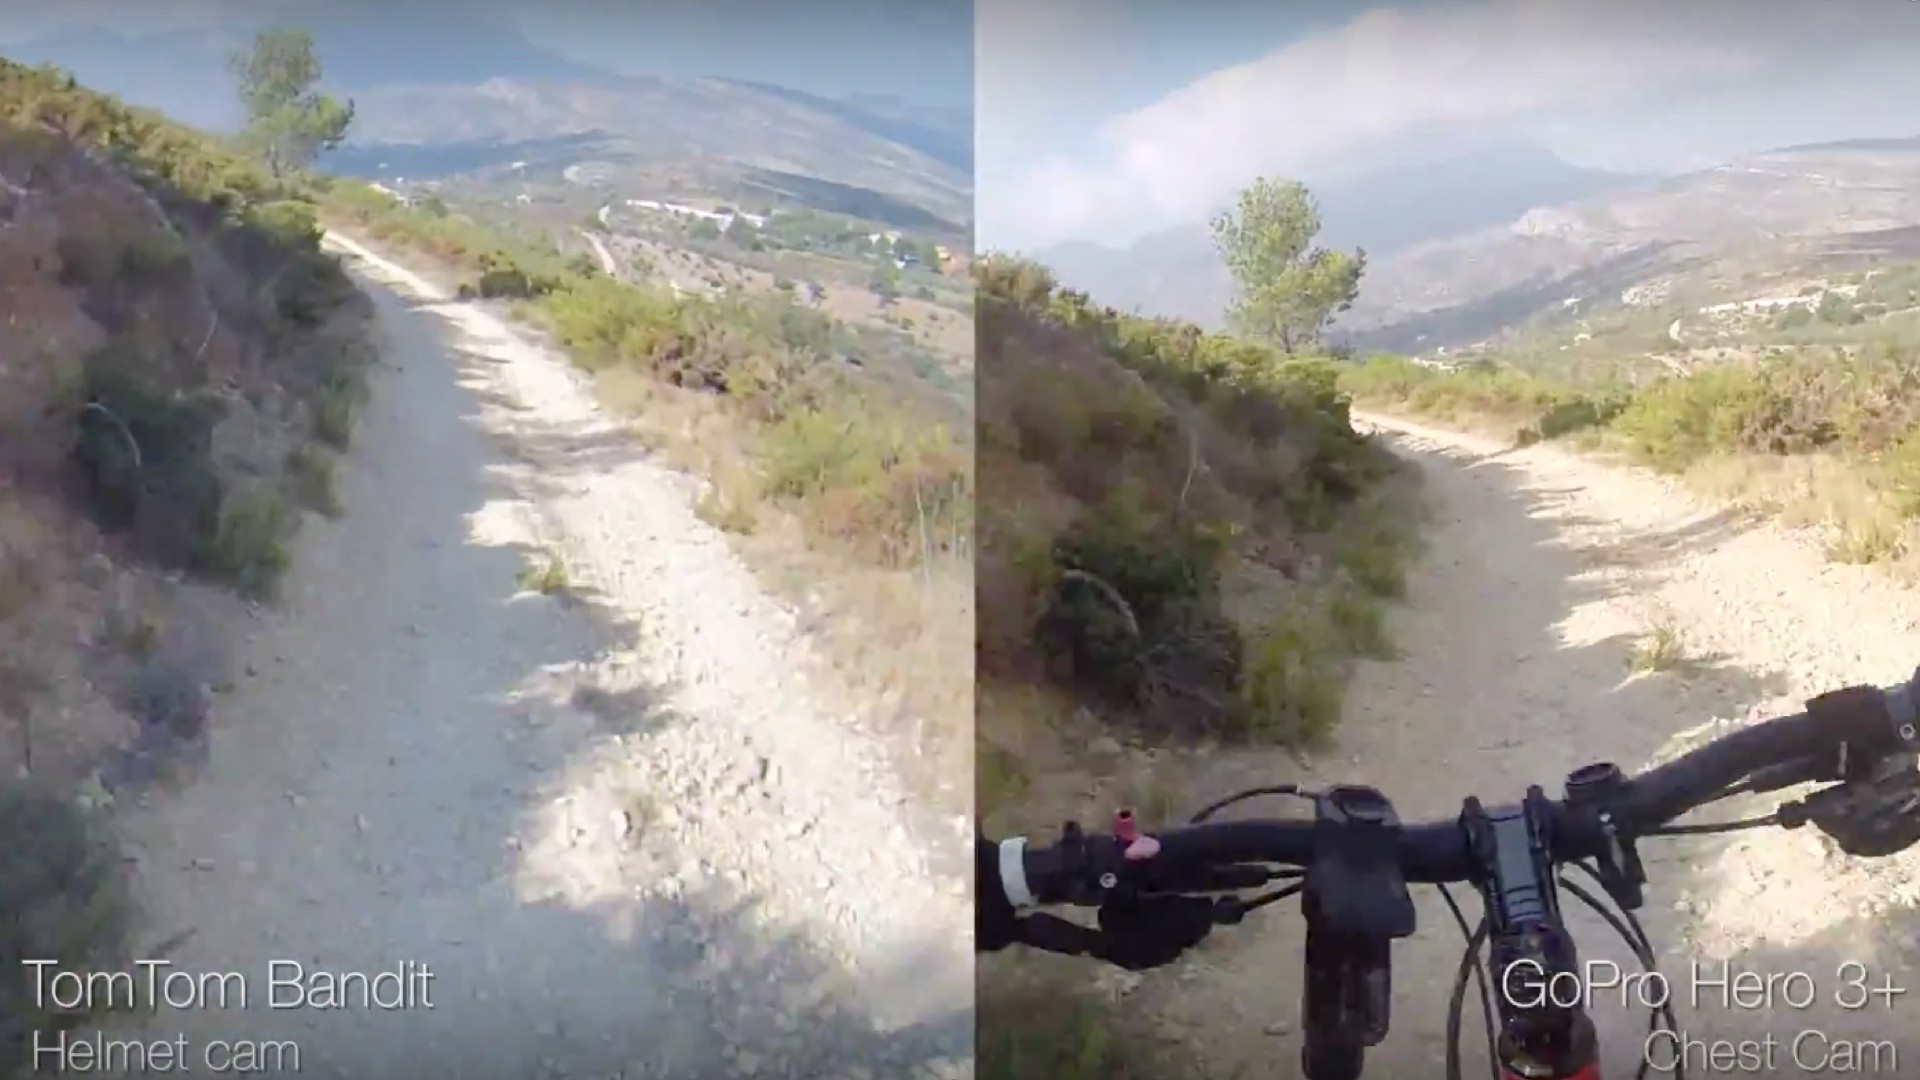 The white balance (slightly more blue compared GoPro) is fine and the image in most lighting conditions is sufficiently sharp, although compared to the GoPro they could improve the Bandit just a bit. But as you can see in the video review, the difference is not that big.
There is an interesting function in which you film directly in slow motion. Normally you shoot your footage at normal speed for example in 1080 at 60fps and make your slo-mo in your editing software suite. To keep the editing process simple (we’ll look at that more in depth later on), the Bandit has the ability to record directly into slo-mo. And you can do that in a range of speeds and resolutions with the ratio between the two chosen in such a way as to ensure a smooth image. Quick, smart and simple. You have to know in advance that you exactly want that piece of the action in slo-mo. So think before you shoot.
Finally, the TomTom also offers the possibility to record foto bursts and time lapses. Works fine for me and I consider it a basic functionality for an action cam.
The white balance (slightly more blue compared GoPro) is fine and the image in most lighting conditions is sufficiently sharp, although compared to the GoPro they could improve the Bandit just a bit. But as you can see in the video review, the difference is not that big.
There is an interesting function in which you film directly in slow motion. Normally you shoot your footage at normal speed for example in 1080 at 60fps and make your slo-mo in your editing software suite. To keep the editing process simple (we’ll look at that more in depth later on), the Bandit has the ability to record directly into slo-mo. And you can do that in a range of speeds and resolutions with the ratio between the two chosen in such a way as to ensure a smooth image. Quick, smart and simple. You have to know in advance that you exactly want that piece of the action in slo-mo. So think before you shoot.
Finally, the TomTom also offers the possibility to record foto bursts and time lapses. Works fine for me and I consider it a basic functionality for an action cam.Audio
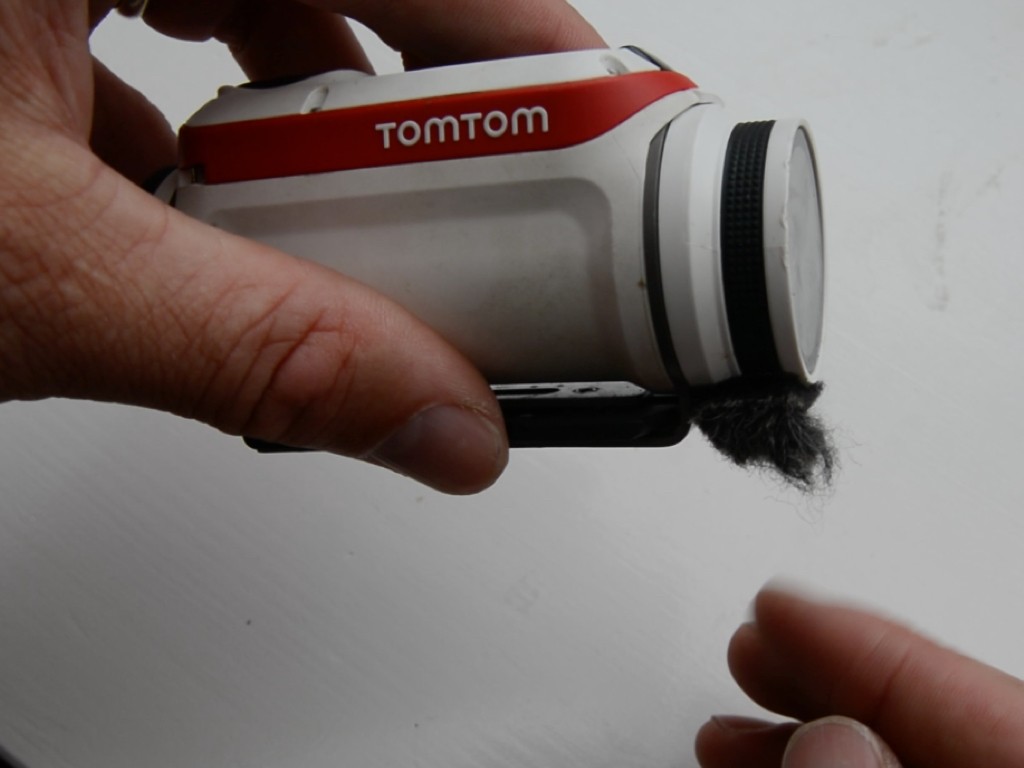 On the front of the camera, under the lens, TomTom has placed the Bandit’s microphone. Makes sense because the source of the sound, of course, is often the subject of your shot. The disadvantage of this is that if you’re shooting at high speed, the wind rushing into the mic will produce a lot of wind noise. Other sounds are totally drowned. TomTom has come up with a funky little solution to that. The Bandit has been provided with a kind of small fluffy windshieldy thing which is attachable to a velcro strap/sticker which you stick onto the camera, over the microphone. This windshield, resembling the goatee of a goat (perhaps no coincidence that the goat prominent figures in the marketing of the Bandit) reduces the wind noise quite substantially. Works very well so; beware, do not lose your goatee!
The quality of the audio is also well organized, although you’ll notice that when you sit on more than two meters, the audibility of voices eg rapidly falling. Environmental noise can go step further away much to the forefront and generate noise.
On the front of the camera, under the lens, TomTom has placed the Bandit’s microphone. Makes sense because the source of the sound, of course, is often the subject of your shot. The disadvantage of this is that if you’re shooting at high speed, the wind rushing into the mic will produce a lot of wind noise. Other sounds are totally drowned. TomTom has come up with a funky little solution to that. The Bandit has been provided with a kind of small fluffy windshieldy thing which is attachable to a velcro strap/sticker which you stick onto the camera, over the microphone. This windshield, resembling the goatee of a goat (perhaps no coincidence that the goat prominent figures in the marketing of the Bandit) reduces the wind noise quite substantially. Works very well so; beware, do not lose your goatee!
The quality of the audio is also well organized, although you’ll notice that when you sit on more than two meters, the audibility of voices eg rapidly falling. Environmental noise can go step further away much to the forefront and generate noise.Usability
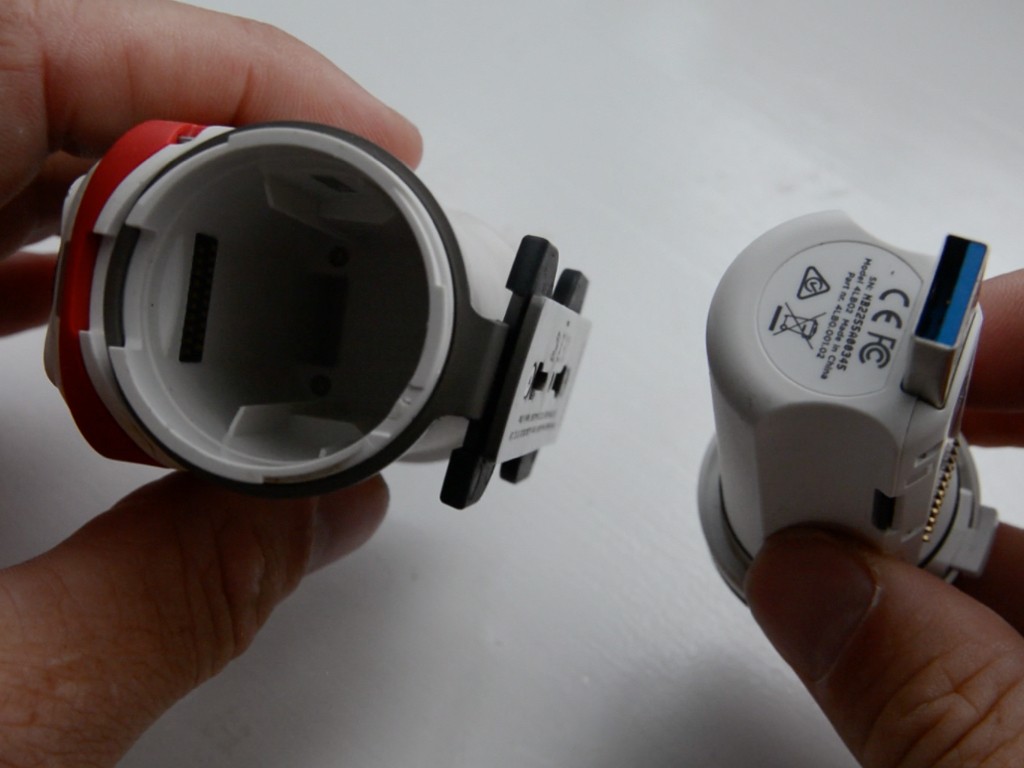 I found the Bandit very easy to use. There are also some nice unique choices that TomTom made. First of which is that the Bandit comes without cables or wired connectivity. The connection to your phone goes via wifi (signal produced by the Bandit itself). The connection to your PC / laptop or access to charger goes through the USB plug which is actually a part of the “batt-stick”, the actual inside of the Bandit. You simply slide it out of the housing of the camera. There are charging led lights on the batt stick to see how far the Bandit is charged. The placement of these can be more convenient though. If I stick the batt-stick into my Mac, the lights face downward so you can’t actually see them. A minor detail. And for other PC or iMac set-ups, it might work fine.
In addition, you can easily slide your Micro SD card into the appropriate slot on the battery stick. Betandsoverdracht to your PC is very rapidly thanks to the USB 3.0 port.
The menu on the camera is extremely easy to operate. The central navigation button makes it possible to navigate, left, right, up and down, running through the various menu options easily and never really losing your way in the menu. Right away I made much fewer navigation mistakes in the Bandit menu than I still make on my GoPro that I have been using for the past eight years.
The battery life is excellent, not necessarily to write home about, but certainly not below par. In some tests to get the 1080p / 60fps over 2 hours of continuous movie time.
I found the Bandit very easy to use. There are also some nice unique choices that TomTom made. First of which is that the Bandit comes without cables or wired connectivity. The connection to your phone goes via wifi (signal produced by the Bandit itself). The connection to your PC / laptop or access to charger goes through the USB plug which is actually a part of the “batt-stick”, the actual inside of the Bandit. You simply slide it out of the housing of the camera. There are charging led lights on the batt stick to see how far the Bandit is charged. The placement of these can be more convenient though. If I stick the batt-stick into my Mac, the lights face downward so you can’t actually see them. A minor detail. And for other PC or iMac set-ups, it might work fine.
In addition, you can easily slide your Micro SD card into the appropriate slot on the battery stick. Betandsoverdracht to your PC is very rapidly thanks to the USB 3.0 port.
The menu on the camera is extremely easy to operate. The central navigation button makes it possible to navigate, left, right, up and down, running through the various menu options easily and never really losing your way in the menu. Right away I made much fewer navigation mistakes in the Bandit menu than I still make on my GoPro that I have been using for the past eight years.
The battery life is excellent, not necessarily to write home about, but certainly not below par. In some tests to get the 1080p / 60fps over 2 hours of continuous movie time.Mounts and accessories
The TomTom has its own series of mounts that unfortunately we didn’t have available during the test. Ironically, we only had GoPro mount adapter, which was great because we could mount the Bandit to all our GoPro accessories and could make the different shots you would need in an edit. If we get hands-on experience with the mounts we will add to this review. If you are curious about this lineup of mounts and accessories, check here.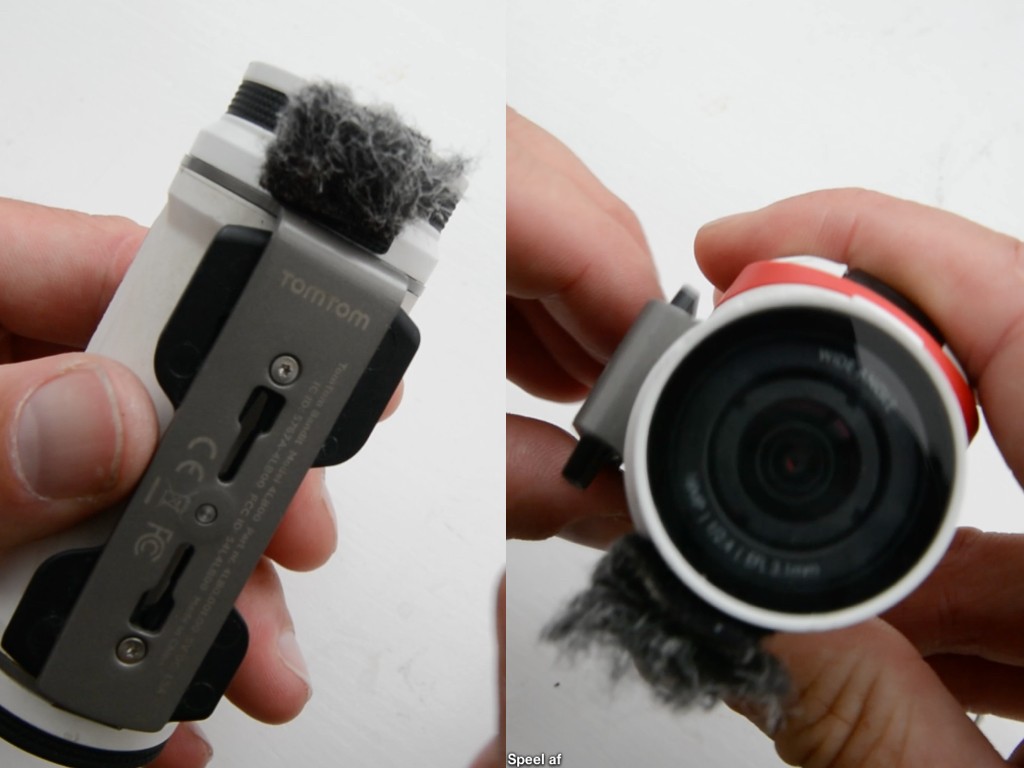 What I really like is that TomTom has a steel frame the different mounts click into. it’s a very simple system (quick release, no hassle with screws) which the camera still fastened into quite well. This camera can rotate 180 degrees in this frame. Especially when using side mounts (eg side helmet) this is a great help. No hassle with different sorts of connection clips, which can at times lead to complete constructions on your helmet. Just snap into the mount and rotate the camera as a whole until it has the correct angle. And when you change your mount direction, simply rotate the camera to the new desired angle.
The Bandit also comes with a remote. It connects very simply, and I used it on a number of bike rides from my handlebars. I generally have my action cam so close that I almost never need a remote. Regardless, it does work well. On, off and to mark highlights.
The Bandit has no casing as many action cams do and is basically waterproof to 10 meters deep and half hours straight as is. With the optional waterproof lens cover you can get it safely to 50meters deep. We did not test this depth as we did not have the lens cover available.
Turning the camera on and off works with two different buttons. I sometimes find that difficult to work (especially as I am used to just one button), but also because you often find your fingers looking to find the correct button those buttons. Especially the off button is flush with the surface of the housing, so it is quite difficult to find solely by touch (as a result your clip continues to run if you have not clicked well enough.) I prefer just one on and off button which you can find and operate easy by touch. After all: eyes on the trail / slope / waves / sky and so on! A god example of this is the sliding button on the Garmin Virb Elite. You can feel that your camera is on or off.
What I really like is that TomTom has a steel frame the different mounts click into. it’s a very simple system (quick release, no hassle with screws) which the camera still fastened into quite well. This camera can rotate 180 degrees in this frame. Especially when using side mounts (eg side helmet) this is a great help. No hassle with different sorts of connection clips, which can at times lead to complete constructions on your helmet. Just snap into the mount and rotate the camera as a whole until it has the correct angle. And when you change your mount direction, simply rotate the camera to the new desired angle.
The Bandit also comes with a remote. It connects very simply, and I used it on a number of bike rides from my handlebars. I generally have my action cam so close that I almost never need a remote. Regardless, it does work well. On, off and to mark highlights.
The Bandit has no casing as many action cams do and is basically waterproof to 10 meters deep and half hours straight as is. With the optional waterproof lens cover you can get it safely to 50meters deep. We did not test this depth as we did not have the lens cover available.
Turning the camera on and off works with two different buttons. I sometimes find that difficult to work (especially as I am used to just one button), but also because you often find your fingers looking to find the correct button those buttons. Especially the off button is flush with the surface of the housing, so it is quite difficult to find solely by touch (as a result your clip continues to run if you have not clicked well enough.) I prefer just one on and off button which you can find and operate easy by touch. After all: eyes on the trail / slope / waves / sky and so on! A god example of this is the sliding button on the Garmin Virb Elite. You can feel that your camera is on or off.Edit / App
As mentioned the unique thing about the Bandit is mainly they way it deals with, or rather the way TomTom has decided to deal with editing. The focus of their marketing is: “Just shake to edit”. Before we can say anything about that, we need to look closer into the principle of “highlights”.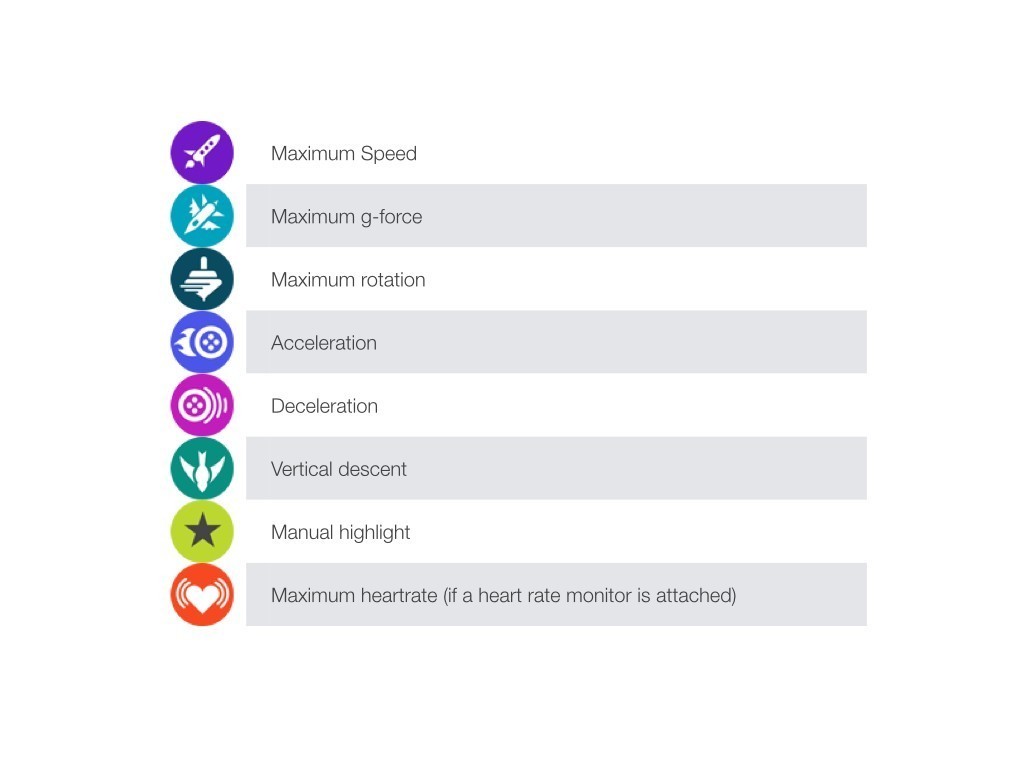 TomTom assumes that every piece of video has certain highlights – quite right, obviously. Fit them together and you’ve got a video. In action sports, these highlights will mainly related to speed, g-forces or heart rate. You rocket downhill, run through a tight turn, feel the adrenaline rush, and so on. Because the Bandit has GPS functionality, and you can connect with a TomTom heart rate monitor (we had none available, unfortunately), the Bandit can make highlights of the moments when these data points spike. In the clip, the Bandit automatically marks the highlights and these can be recognized on the timeline of the clip by the various icons. The problem is that not all icons are immediately self-explanatory, and no information is provided (in the app or otherwise) as to what every icon means. Beside these lines, you can see the list of the icons and their meanings. In addition to that, you can mark highlights manually during recording, by pressing the on / highlight button, if you have a hand free that is. That is where the remote can come in handy. Also afterwards, while playing back the images in your app you can add extra highlights.
If you want to create an edit, you connect the Bandit through its own WiFi signal to your smartphone or tablet. When you do, the app reads the images out to your smartphone. That happens from a media server that is built into the Bandit. This is an important advantage; because you actually stream the footage to your smartphone (you don’t need to upload the footage to your device, which would take ages and finish off any remaining memory space on the device), the connection is very fast and you can mount easily and quickly.
TomTom assumes that every piece of video has certain highlights – quite right, obviously. Fit them together and you’ve got a video. In action sports, these highlights will mainly related to speed, g-forces or heart rate. You rocket downhill, run through a tight turn, feel the adrenaline rush, and so on. Because the Bandit has GPS functionality, and you can connect with a TomTom heart rate monitor (we had none available, unfortunately), the Bandit can make highlights of the moments when these data points spike. In the clip, the Bandit automatically marks the highlights and these can be recognized on the timeline of the clip by the various icons. The problem is that not all icons are immediately self-explanatory, and no information is provided (in the app or otherwise) as to what every icon means. Beside these lines, you can see the list of the icons and their meanings. In addition to that, you can mark highlights manually during recording, by pressing the on / highlight button, if you have a hand free that is. That is where the remote can come in handy. Also afterwards, while playing back the images in your app you can add extra highlights.
If you want to create an edit, you connect the Bandit through its own WiFi signal to your smartphone or tablet. When you do, the app reads the images out to your smartphone. That happens from a media server that is built into the Bandit. This is an important advantage; because you actually stream the footage to your smartphone (you don’t need to upload the footage to your device, which would take ages and finish off any remaining memory space on the device), the connection is very fast and you can mount easily and quickly.
Just Shake to Edit.
Basically, you can then assemble a movie by shaking your camera. The Bandit makes its own random choice in which highlights to use and the pastes it together. Very simple and quick, and within seconds you have a video of just over a minute. Then, you can still remove or add highlights. What I realized was that the GPS highlights the Bandit marks are not always natural moments. If you want spoken text in your movie, the highlights never help (perhaps by chance once in a while). Speech is obviously not GPS info. So that makes sense, even though speech can be really relevant to the video you want to make. But also at sudden camera tilts yield (eg you turn your head with the helmet cam), the Bandit will record g-forces and mark a highlight. Sometimes that works out, but sometimes it really doesn’t. Additionally, if you have many clips covering various days, for example, the Bandit can throw highlights together that have nothing to do with each other in terms of subject matter. And then you have to do a lot of correcting afterwards. So I quickly abandoned the shaking. After a little practice, I found an alternative way to quickly edit a video. What I did: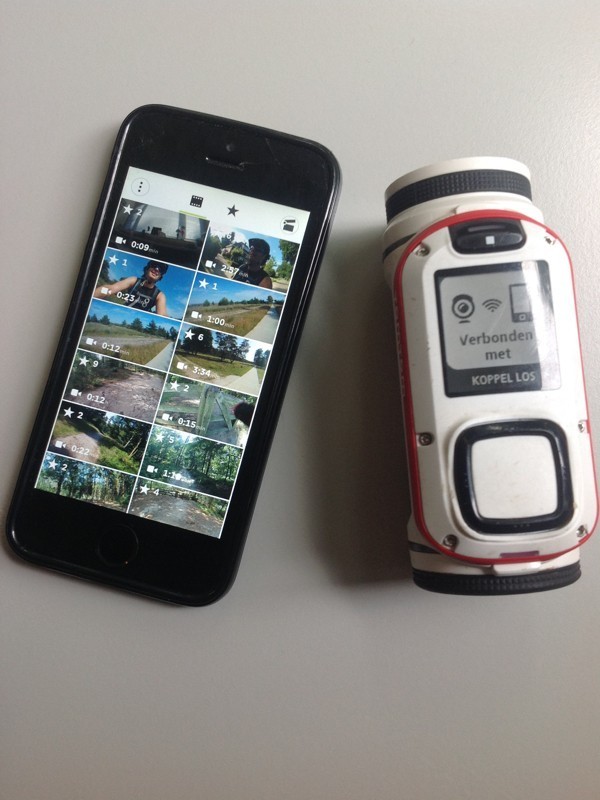 Step 1: First I go through my library of clips. I watch all the clips, if the highlights are good and whether I want to add my own highlights. Some highlights I toke out or I changed the highlight duration or starting point in the clip. I had to find out through google how to do that. This step takes the most time, but playing back your footage can be fun in itself. And you quickly get an idea of what highlights you’ll want to use. And besides, you can also quickly scroll to any highlight on the timeline of the clip.
Step 2: Once I was satisfied with the highlights I choose the option to make a movie, and then instead of choosing “shake to edit” method, tap the green button “add a highlight.” You are directed into the library of highlights, and there you can manually select highlights you want to include in te edit. When you’re finished you go back to the editing screen and check if everything is okay.
Step 3: Adding metrics: It is possible to choose between three metrics, speed, g-forces (if you used a heart rate monitor connected to the Bandit as it rolls). What you get is a graphic overlay of kph?mph, g-force or heart rate. Unfortunately, it is not possible to add multiple metrics in a combined graphic data overlay. Also, there is only one design of the data overlay that you can choose. Undoubtedly TomTom will be adding more options in the future. These are simply software options, you’ll have to update your app. Fun to look forward to. Note that the graphic overlay will be put on every highlight, even those where it is less relevant (if you stand still, during a beauty shot of the environment, etc.). You can remove the graphics from the clips where it doesn’t apply.
Step 4: You can also add a music track. For this the Bandit uses the music on your phone; you can select te track from your iTunes Library. Note that once you have added a track, while you can easily exchange it for another, you can’t go back on your decision to use music at all. That’s a pity. Because sometimes you come to the conclusion that without the music video is better. In addition, the loudness of the music can’t be adjusted, and the sounds of your film or quite difficult to hear. Also: there is the rights issue with most popular music and sometimes Youtube can block movies because of copyright violations. Don’t let that hold you back though! A Bandit native library of rights-free music would be cool though.
Step 5: Saving and sharing are easy. When you have finished the edit, the Bandit will write the highlights to the phone and the app makes the movie. Only then is the file on your phone. You can then save it to your camera roll or share via eg Facebook or Vimeo.
There is one great weakness to the app, and that is that your work is not saved before writing the final edit to the phone. The adjustments you do to highlights is saved, but nothing more. As soon as you’re composing your movie, you have to hope that your app does not crash or your phones runs out of juice. Don’t close the app thinking you can finish the edit later. Because your work will simply be lost. I think that’s a major shortcoming and if asked would advise Tom Tom to see if they can allow you to save the “project”.
In short, not quite as it is marketed, but it is possible to create a fun video and share it quickly and relatively easily (certainly in comparison with desktop installation).
Step 1: First I go through my library of clips. I watch all the clips, if the highlights are good and whether I want to add my own highlights. Some highlights I toke out or I changed the highlight duration or starting point in the clip. I had to find out through google how to do that. This step takes the most time, but playing back your footage can be fun in itself. And you quickly get an idea of what highlights you’ll want to use. And besides, you can also quickly scroll to any highlight on the timeline of the clip.
Step 2: Once I was satisfied with the highlights I choose the option to make a movie, and then instead of choosing “shake to edit” method, tap the green button “add a highlight.” You are directed into the library of highlights, and there you can manually select highlights you want to include in te edit. When you’re finished you go back to the editing screen and check if everything is okay.
Step 3: Adding metrics: It is possible to choose between three metrics, speed, g-forces (if you used a heart rate monitor connected to the Bandit as it rolls). What you get is a graphic overlay of kph?mph, g-force or heart rate. Unfortunately, it is not possible to add multiple metrics in a combined graphic data overlay. Also, there is only one design of the data overlay that you can choose. Undoubtedly TomTom will be adding more options in the future. These are simply software options, you’ll have to update your app. Fun to look forward to. Note that the graphic overlay will be put on every highlight, even those where it is less relevant (if you stand still, during a beauty shot of the environment, etc.). You can remove the graphics from the clips where it doesn’t apply.
Step 4: You can also add a music track. For this the Bandit uses the music on your phone; you can select te track from your iTunes Library. Note that once you have added a track, while you can easily exchange it for another, you can’t go back on your decision to use music at all. That’s a pity. Because sometimes you come to the conclusion that without the music video is better. In addition, the loudness of the music can’t be adjusted, and the sounds of your film or quite difficult to hear. Also: there is the rights issue with most popular music and sometimes Youtube can block movies because of copyright violations. Don’t let that hold you back though! A Bandit native library of rights-free music would be cool though.
Step 5: Saving and sharing are easy. When you have finished the edit, the Bandit will write the highlights to the phone and the app makes the movie. Only then is the file on your phone. You can then save it to your camera roll or share via eg Facebook or Vimeo.
There is one great weakness to the app, and that is that your work is not saved before writing the final edit to the phone. The adjustments you do to highlights is saved, but nothing more. As soon as you’re composing your movie, you have to hope that your app does not crash or your phones runs out of juice. Don’t close the app thinking you can finish the edit later. Because your work will simply be lost. I think that’s a major shortcoming and if asked would advise Tom Tom to see if they can allow you to save the “project”.
In short, not quite as it is marketed, but it is possible to create a fun video and share it quickly and relatively easily (certainly in comparison with desktop installation).