Backpacks – GearGuide

arcteryx-nozone-70


If you go climbing, hiking, free-riding, camping,… you’ll need to take along more than you can take in your pockets. A backpack is the glaringly obvious solution. But just buying any back pack is not the smartest thing to do. We advise looking for a backpack that really fits the activity you will need it for. For alpine climbing you’ll need a different backpack than for a multi-day trek through a tropical jungle.

Each activity sets its own specific requirements for a backpack. Manufacturers cater to this and make backpacks that are tailored to the requirements and wishes of the outdoor sportsman.

Also, considerations such as where are you going to practice your sport, under what circumstances, personal preference, etc, play a role in choosing the right backpack.

Image: Arc’teryx Nozone 75

To help you choose the right backpack, we’ve taken upon ourselves to explain a few basic facets of the outdoor backpack.

How to choose the right backpack

There are many outdoor and action sports activities where backpacks are used, such as mountain biking, hiking, alpine skiing, jungle trips, hiking, etc. Each of these sports sets its own specific demands to a pack. Choosing a backpack is finding the perfect combination of the aspects relevant to the particular sport (such as freedom of movement, stability, etc.) and the backpack itself (such as weight, volume, support system, etc.). Aspects like quality, price and personal preference also play a part in the final choice.

Choose a backpack based on:

Use

What are you going to use the backpack for? Day trips demand other things from a backpack than a multi-day alpine ski ride or a 15-day trek through the Surinamese jungle.

Comfort

A backpack is rarely a really comfortable thing to where. But there is a lot you can choose from to make it as comfortable as possible for what you are doing.

Freedom of movement

The backpack should be tailored to the length of your back and the build of your body. It should restrict movement of arms, legs, head, and back as little as possible. It is also important that the backpack follows the curvature profile of the back. Freedom of movement is essential for action sports.

Stability

A backpack that shakes around on your back like an old pick-up truck on a mountain road is an annoying thing, to say the least. A backpack that is strapped to your back and hips should feel like it is really connected to your body and follows your movements smoothly.

Besides these personal aspects, there are some general aspects that are very relevant to your choice.

Durability / Quality

A good backpack should last for yours. It should be able to stay with you through many, many horizontal and vertical kilometers without any problems. The way you use the pack will obviously have an effect on this: proper packing and loading, how you carry and care for the pack is crucial to its durability.

Price

Obviously an important consideration and clearly related to the quality of materials, durability, construction etcetera. The listed aspects you can base your choice on are influenced by:

Weight

The weight of the backpack itself should be as light as possible. The center of gravity of the load should be carried as close as possible to the body with the brunt of the load carried on the hips. Various backpack manufacturers are producing packs with very light yet durable materials.

Volume

Choosing the correct volume is important. Volume determines how much you can pack – looking to fit all your stuff into the pack so that everything is well protected and kept as dry as possible. The higher the volume, the more you can pack, and conversely, the more your pack will weigh. The larger and heavier it is, the more it will hinder and restrict your freedom of movement.

Back system

A good back system has an extremely large impact on a comfortable wear, but also on the stability of the pack. Check how the curve of the hip belt follows and fits to your hips, make sure to see how well the shoulder straps line up with your shoulders, or how well you can adjust the system itself. Quality of buckles, ease of buckling and adapting the length of straps. Good padding on the back system lining up against the tailbone and shoulder blades ad to carrying comfort. Things to look out for but that also can add weight.

Load system and compartment

During a hike or in a small cramped tent you want easy access to your gear. In some situations, it’s not useful if you can only use your stuff via the top box (and what you need is at the bottom). Acces from the side or bottom of the pack, in addition to various pockets/compartments in the pack, makes it easier to organize your load in such a way that you have easy access to all your gear.

Html code here! Replace this with any non empty text and that's it.

Use

The first question you have to ask yourself is; What activities am I going to do / where do I want to use the backpack?

If you do single day walks in the summer and go ski touring in the winter, you probably will need more than one (day) pack. Just because the activities themselves, the circumstances and the gear you carry with you are so different.

If you decide to use the (day) pack multifunctionally, for school and for day trips, for example, it’s smart to look at backpacks with a larger capacity. Are you climbing occasionally during your hikes? Then consider a narrower backpack so your arms have all the freedom of movement.

All examples of questions you might want to ask yourself. So what kind of backpacks fit certain type of activities?

Day trips

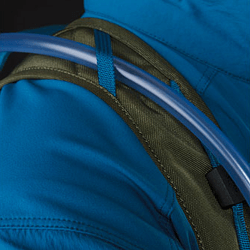
For day trips, you will often only take food and something to drink. You’ll want a bit of room to stow away your phone and/or camera. You’ll also want to pack a light raincoat or an extra layer just in case the weather turns towards the wet and cold. Look for backpacks between the 15 and 25-liter mark. If you foresee a high-intensity activity in may be smart to look at a backpack that is compatible with hydration systems such as the well-known CamelBak. The backpack brand Osprey has its own hydration packs that suite perfectly to their line of packs. Many (day) packs are also outfitted with side pockets for taking a drink.

Small day trips: 10 – 20 liters;
Day trips: 20 – 40 liters.


Multiple day trips

You might look for multi-day hikes in heavy and varied terrain. Backpacks for multiple day trips are available in different variations. The requirements for multiple day trips from two to four days may be different from the requirements for heavy treks of five days or more. As you spend more days on a hike, into more backcountry terrain you will probably bring more gear and supplies with you. This is when the load-bearing system really comes into its own and you need to choose wisely. In this category of packs there are models which can easily to offer more carrier volume or conversely when you’re not taking along too much, can be strapped or zipper down and compressed so as to feel less bulky. As for volume, you can keep to the following rule of thumb.

Multiple day trips from two to four days: 40 – 50 liters;
Four-day or longer camping rides with lots of supply options: 50 – 60 liters;
Four-day or longer camping rides with low supply possibilities: 60 – 90 liters.

Hiking & Expeditions

Backpacks designed for expeditions and treks are offered in large volumes. This because you’ll be taking along much more food and drink, fuel, sleeping bag, isolation mat, a tent and other necessities. The bigger the pack, the larger the weight being carried the more attention you need to pay to the distribution of the load within the pack, and how the pack is organized to keep the items you need to be stored evenly and easily accessible.

Expeditions and long camping rides/winter trips of five days and longer 80 – 100 liters.


Climbing

To do this, you choose a smaller backpack. If you climb on high altitude, you should take into account a larger volume because you need to take more clothes. Your climate ambition determines whether you need a multi-day backpack of small volume or need a large technical backpack. Compare your required material (ropes, carabiners, etc.) with the necessary additional options that the backpack can be equipped with (iceberg attachment, fastening loops). Climbing bags are often provided with compression straps, a chest strap is very valuable.

Climbs of one to two days: 20 – 40 liters;
Climbs of two to four days: 40 – 50 liters.


Ski tours

For skitours, it is advisable to choose a small backpack so you can move your arms freely. Make sure your backpack is equipped with the ability to attach skis. A chest strap and hip strap are essential. Climbing bags are often good for skiing.

Ski trips of a day: 20 – 40 liters;
Ski trips from two to four days: 40 to 50 liters.


Trail running/adventure racing

These are often small backpacks equipped with bottle holders and/or hydration systems. Hip models are also available. The advantage of this is that they are less likely to shift while walking and they keep your back free so sweat can be removed properly.

Trail-running backpack is on average 10 liters.


Travelling/Backpacking

For travel by air and public transport, other requirements are imposed on the backpack. These backpacks are often provided with two or more compartments, a magazine or notebooks box, space for equipment (laptop, tablet, phone) and a box for pens and other small items. What is very useful for travel backpacks is that they are often provided with workable shoulder and hip straps. Also, the opening is not via a top cover but via a large zipper opening at the front.

Travel backpacks 60-80 liters.
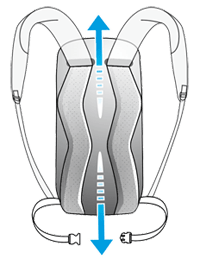
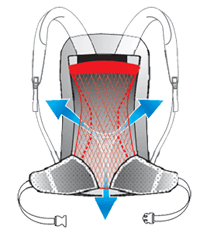
Weight

How do all those liters translate into weight? Not directly, of course, because different materials weigh differently, but be careful not to buy a backpack that is so big that if you fill it up, it’s no longer possible to lift it. The weight of the backpack itself also adds to the total weight.

The less the backpack itself weighs the less you have to lift. In principle, a lighter backpack is to be preferred over a heavier. Sometimes, however, the higher weight of the backpack is compensated by better fit, greater comfort, better use of materials (for example for better waterproofing) and more stability.

Hoe minder de rugzak zelf weegt des te minder heb je te tillen. In principe heeft een lichtere rugzak dus de voorkeur boven een zwaardere. Soms echter wordt het hogere gewicht van de rugzak gecompenseerd door een beter pasvorm, groter draagcomfort en meer stabiliteit.

The right fit

The key to comfort is a well fitting backpack. To start with, you need some help to measure the length of your back, which is measured from your shoulders to the top of your hip bones. Once you’ve done this, you can compare that measurement to the specifications of the backpack.

The measurement of your hips is also important, although most hip belts are adjustable. In any event, make sure that the hip belt feels snug and comfortable. Some backpacks feature replaceable hip belts.

Adjustment

For most backpacks, it is possible to adjust the back length by means of an adjustable back system. Another possibility is a fixed support system that is not adjustable. The advantage of this is that it is less complex and lighter (and often cheaper) compared to an adjustable model.

Women-specific backpacks

Women’s backpacks have narrower shoulder straps, a conically shaped hip belt and shorter back lengths specifically designed for the female body.


Six steps to the right fit

80% to 90% of the weight of the backpack should on your hips and not hang from your shoulders. To make sure that you dial in the fit of your backpack put 20 to 30 kg in the backpack to simulate a full load. Stand in front of a mirror and follow the steps below. You can ask someone for some assistance.

Step 1: Hip belt

  • Make sure all straps – including those of the hip belt – are loose.
  • Place the backpack on your back so that the hip belt rests on your hips.
  • Close the hip belt buckle and tighten the straps of this buckle. In order to prevent the backpack from sliding down during your adjusting the hip belt, it is useful to do this while you are bending forward just a bit.
  • Make sure that the soft (lined) sections of the hip belt are comfortable around the hips. There should be at least 2 to 3 cm of space between both parts of the central buckle (otherwise you can not tighten the hip belt)
  • If the hip belt is too loose or too tight, first try to move the buckle on the hip belt. If this does not work, try another backpack (or hip belt).

Step 2: Shoulder straps

  • With the weight on your hips, pull the shoulder straps downwards and backwards so that the straps are tightened. The shoulder straps should be tight over the shoulders to keep the backpack against your back. However, the shoulder straps should not carry the weight.
  • Have somebody check that the points where the shoulder straps are attached to the backpack are 2 to 5 cm lower than the highest point of your shoulders.

Step 3: Load-lifters

The load-lifters are placed just below the top of the shoulders (at the height of the collar bone) and should be drawn at an angle of 45 degrees relative to the backpack.
By varying the stress on the load lifters, you divide the weight over your shoulders and thighs. This balances the load.

Step 4: Chest strap

  • Place the chest strap at a comfortable height on your chest.
  • Tighten the chest strap until the shoulder straps are comfortable and you are able to move your arms freely. The chest strap is not meant to carry any part of the weight, but to ensure that your shoulder straps are held in place.

Step 5: Stabilization straps

  • Pull the stabilization belts – attached to both sides of the hip belt – so that the backpack is pulled to the hip belt and stabilizes the backpack. These work closely with the “load-lifters” (both are essentially stabilizers).

Step 6: The final adjustment:

  • Go back to the shoulder straps and loosen them ever so slightly to release the tension on the straps. You’re ready to hit the road!

Back and Hip measurements

Back length

ruglengte

It goes without saying that a backpack, much like a jacket or a shirt should feel and fit well. How high/long you are – for example, 190 cm – says nothing about the size your backpack should be. Your back length, however, does dictate the size of your backpack. There are back systems that allow you to adjust the distance between your hip belt and shoulder straps, but these also have their limits. Measuring well and matching the size of your intended pack to the length of your back is very important.

Find the place in your neck where your shoulders and neck meet. This is the 7th vertebra. If you bend your head forward it’s even easier to find the correct place.
Use a tape measure and ask someone to help you down measure along your spine starting at that 7th vertebra and going on towards your hips.
Put your hands on your hips so that you can feel the bones the hip belt rests on. As you hold your hips, your thumbs should point towards your back.

Ask the person helping you to measure the distance to the point where the tape measure crosses the imaginary line that runs between your thumbs. This distance is your back length.

Use this measurement to select the right backpack size. As a rule of thumb, manufacturers use the following dimensions:

• Extra Small: Back lengths up to 36 cm (15.5 inches)
• Small: Back lengths 14 to 44 cm (16 to 17.5 inches)
• Medium / Regular: Back lengths from 46 to 50 cm (18 to 19.5 inches)
• Large / Tall: Back lengths of 51 cm (20 inches) and larger

If you are measuring on the limit of a size (for example 44 cm), it is advisable to try on and fit both sizes (Small and Medium). See what feels best.

Hip width

Although not as important as your back length, it is useful to know your hip width. It is especially useful when purchasing a backpack with removable hip belts.

Take the tape measure and measure the circumference of your hips. At the point where you can feel the bones just above the pockets of your pants. A well-fitting hip belt will give support about 2 cm below or above this line on the hips.

The Haglofs Nejd combines both top and front loading.

Layout – Front loader or top loader

You don’t have your backpack on your back all the time, you’ll be taken stuff out, and packing it again, multiple times a day you have access. That means the way the backpack is designed and compartments within the packs are organized and accessible is very important.
With most of the backpacks, the main compartment is accessible at the front or through the top. The front loader has the advantage of being easily accessible while the top loader is designed to keep a pack as lightweight as possible. (front loaders will use longer zippers) There are manufacturers that combine front and top loads for maximum access to the backpack.

Front loading backpack:

These are mainly backpacks that allow access to the main compartment by means of a U-shaped zipper. When the zipper is fully opened, the panel is removed as a valve. This has the advantage that the content is easily accessible. The disadvantage is that zippers are vulnerable to wear and tear and unless specifically designed, will be less or not waterproof at all.

Top loading backpack:

These packs are generally simpler in design and lighter than front loaders of similar size. Some top loaders feature an expandable lid that creates extra space for additional material. This may be important for climbers who often take a lot of material and do not want to climb with a backpack with extra volume. Most of that content will be used (rope, shoes, helmet). With top loaders, there is often a separate bottom compartment with separate access that will allow you to access your items there.

Back systems/ Carrying systems

Nowadays, the pack frame is integrated into the back of the pack, which gives you greater freedom of movement and comfort. Backpacks with a flexible frame provide a good compromise between stability and comfort. Backpacks in which the contact with the back is limited to the middle of your back are least stable. Side support is really important. The pack frame should follow the contours of the body nicely.

There are two types of support systems:

Internal support systems

  • Adjustable support systems – making it possible to precisely match the support system to your back measurements. Often a step-by-step system that allows the shoulder straps to be adjusted up and down in small steps.
  • Fixed support systems – tuning the fit to your body size is not possible. The advantage is the lack of complexity and lower weight.

External support systems

The advantage is that higher weights are easier to carry and it can provide greater wearing comfort. The disadvantage is the added weight of the support system itself.

Ventilation

rugzak-ventilatie-back-system-vent-tex
Image 1

The drawback of a really good fit to your back, is that you will sweat more. Many backpacks are therefore equipped with a ventilation duct (Image 1). Other solutions are where the main back panel does not connect directly to your back (Image 2). Especially if you walk on hot days, these systems are very pleasant.

rugzak-ventilatie-back-system-aeroflex
Image

However, the system shown in image 2 is only suitable for relatively smaller backpacks – up to about 45 liters – because your center of gravity will be farther away from your back. With a larger weight, you want it as close to your back and hips as possible.

Integrated hydration systems

rugzakken-Pyxis-18-Backpack-Cargo-Green-Shoulder-StrapMost backpacks have a compartment in which a water bag fits and have a small opening for the drinking hose.

The water bags are sold separately, except for the specific hydration packs. Backpacks are also equipped with stretchable “cup holders” on the side.

Belts & Straps

Backpacks contain belts to prevent the contents of the backpack from getting too loose (as you deplete your food storage supplies, for example). These belts are on the side of the backpack and are specifically designed to increase stabilityThey increase stability.

rugzak-load-lifters-arcteryx-nozoneThe straps on top of the shoulder straps (load lifters) are very important. With these straps, you pull the backpack (the weight) closer to your back. It is important that these straps are not tightened until the hip belt is fixed to the correct height.

rugzak-compressie-riem-zijkant-arcteryx-nozoneThe straps should run at an angle of about 45 degrees to your shoulders; the highest point is on your backpack. Viewed from the side, the straps are high (at backpack) to low (at your shoulders). These straps also increase the stability and make the backpack “weigh” less (because the backpack is closer to the body).

A chest strap also provides greater stability. In addition, this belt pulls the shoulder straps a little more inwards, reducing the fatigue of the shoulders.